Thursday, December 9, 2010

A Tale of 4 Rings: Day 4

Day 4: Stock

I found this material to be the most difficult to work with.  Sawing took ages and so did every other means of manipulation.  My only thoughts going in to this project was that I wanted to form the stock using alternating levels of brass and copper sheet and that I wanted to sculpt it to fit into the crevice between the fingers.  I had never used this form of metal before and didn't know how best to manipulate it, so I left that aspect open.  I want to make an organic form and I was told that I should utilize the immense amount of metal shavings that come from sculpting the material.

I spent multiple hours with several 60grit sanding wheels and metal burs, as well as a belt sander.  I let the project evolve as I made it  and only kept the location on the hand in mind as I worked the metal.  Here are the results.
This is the piece of stock I carved away at.  That was easier to construct than I expected due to it's minimal dimensions.
Here are my results.  I carved the piece such that the shavings could fall into the copper crevices.
The underside of the piece is curved to fit into the space between the two fingers.
I really love the interplay between the sculpted piece and the metal dust.

A Tale of 4 Rings: Day 3

Day 3: Sheet

For this ring, my original design was very structured and clean, which is what I am most comfortable with.  In my design review I was told to continue with this design but then to destroy it.  Through this process I would learn the organic forms that sheet metal takes when it is being hammered and it would free me of my need for precision and a completely planned process.  It was a terrifying and heart-wrenching task but I followed through because I felt it was important for my development. 

I constructed the ring fairly easily and quickly, and immediately upon its completion I opted to destroy it, as not to get attached.  Here are a few photos before the destruction.  Thanks to Tai for modeling so beautifully.


Below are the photos taken during the several stages of deconstructing this ring.
 The scene of the murder and the many murder weapons.
 Collapsing in the sides of the structure.
 This is while the ring still looked decent.  This is with the collapsed in sides that made it look somewhat like it was melting or sagging.
 A view from the front of the melted sides.
 I then smashed the piece directly from above.  The collapsed sides made the form fall in on itself.  It was a beautiful process that resulted in a terribly ugly form.
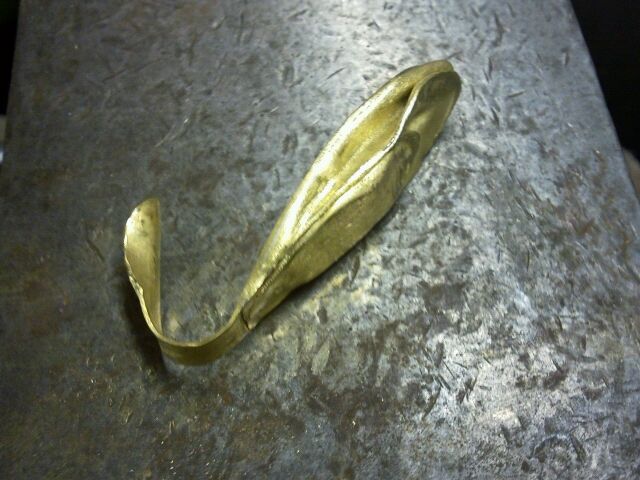
 I then smashed and folded the form as far as I could with the strength in my arms.  I used a clamp to hold one side while wailing on the other to help fold it in half one last time.
 At this point I did everything in my ability to take this ring down to a nugget of brass.
This was a test of my strength of will as well as my soldering abilities.  None of my seems popped though I may have lost a bit of my sanity.

A Tale of 4 Rings: Day 2

Day 2: Tube

For this form I attempted to make a sculptural hand piece, utilizing a commonly structured, geometric form of metal to accomplish an organic, flowing contour.  It's very interesting to see people pick this ring up and try to figure out how to put it on without instruction.  I've seen many variations but no one has discovered its intended use without instruction.  How would you put this on?
Here is a photo of the piece in progress.  Filing the correct curve in each extended tube was extremely difficult.  If they didn't fit perfectly over the base tube there was no hope for stability in the entire piece.
This is an image of the piece pre-patina.  I discovered the magic of using Nickel Pickle to remove the copper coating from brass.
Each piece is a different size of collapsed and manipulated brass tube.  Here is an image of my studio pals, Jess and Catherine, with my late night studio dinner of vending machine coffee and cheez-its.
Below are some clearer shots of the intended use of the ring.

The base tube is designed to fit comfortably into the first joint of the fingers.  I find that the most comfortable way to wear this ring is with a fist.

Sunday, December 5, 2010

A Tale of 4 Rings

Our last project in Metals III is a series of four rings, all made from a different form of metal: sheet, stock, wire, and tube.  They are not supposed to look like their original material when they are finished and they must not be the conventional "ring" shape.  My goal is to make one a day for the next four days, as they are due on Thursday....it's going to be rough.

Day 1: Wire

I call this ring "AntiMegan."  I did everything in my power to make a ring that goes completely against my instincts and comfort zones.  It's messy and organic and I am in love with it.  It was incredibly freeing.  The thing broke apart four times but I just breathed and fixed it.  It took six hours from start to finish.

Jess and I worked in the studio together and finished our rings at exactly the same time.  Exactly.  These are our two finished rings. Both are made from wire.  Hers is wire soldered together into sheet and mine is wire balled up and fused.
I somehow managed a rainbow patina on sterling silver with week old liver of sulfur.  My thought is divine intervention.
This is made from balled up wire fused to a wire free-hand form.