Saturday, November 27, 2010

3D printed columns!

I received my Shapeways order and it is faaaantastic!  The mechanism works wonderfully, even in the smaller size, and the shape looks lovely in the white material.  I am so pleased!
 This is the larger column that I am most pleased with.
 I designed the curves of the cap to become finger holds for unscrewing the top.
Here is a view of the open object.  It works in eight lock and key mechanisms and the course surface of the material makes it hold shut very nicely.
This is a view of both sizes I got printed.  The larger one is a table piece and the smaller one has rods that insert into IV tubing to become a necklace.  I want to finish the surface of these pieces but I love how it looks now.  I'm thinking a spray lacquer might do the trick.  Below is a video of the mechanisms and how beautifully they worked out.  Enjoy!

Monday, November 22, 2010

Mold Misery

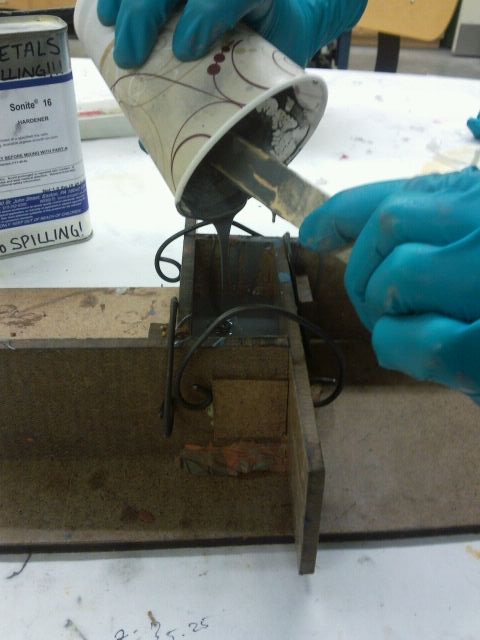
I went to take my mold apart, this afternoon, to find it stuck together.  With Rachel's assistance, we were able to lodge a screwdriver in the port to get it apart.  At this point it was evident that the pegs on either side of the column had gotten stuck in the mold while the molded pegs had, in turn, gotten lodged within the original model.  The cavity had also fused within the model.  This completely destroyed the mechanism of the piece so I just wanted to get the model out of the mold successfully so I could cast a solid version of my column.
 Above is Rachel trying to lodge the screwdriver behind the model to pop it out.
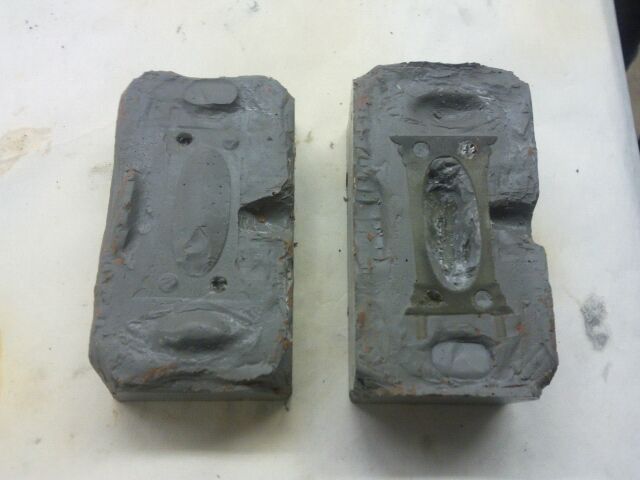
These are the two parts of the mold with the shapeways piece completely lodged in side 1.
This is Rachel realizing the only way to get the model out is to shatter it.

 This is the result of that...and Jan sawing the side in half.  The plastic fused itself to the molding material somehow, despite my exhaustive mold release efforts.  We are thinking this might be due to the fact that the mold material heats as it cures and this may have heated the model such that it fused.  It is a huge disappointing mess at this point.  There is no way to salvage the model or the mold so I must simply find another way.

Mold Making

I received the rest of my shapeways order finally!  Now to making a mold!
 Building my mold walls.
 Prepared base with port and loads of mold release.
 Jess helping me out with measuring mold material.
 Pouring side 1.
 1 day later....poured side 2!

Thursday, November 11, 2010

Got My Shapeways Order!

I came back to my apartments after fem class, to find that magical little white box outside my door.  Here is what I found within it!  I received my order minus the model actually applicable to my current project, but I was thrilled nonetheless. 
 Chain is thanks to a design by Vitrox!
 It is lovely.  It is way, way too long.  But it is lovely.
Part 4 in a 5-part morphing ring series.  I'll get them all printed some day.
Demonstrating the flexibility of the White Strong and Flexible material.  These are 1mm pipes.

Thursday, November 4, 2010

Rhino Progress

    I am currently working on the injection molded and rhino versions of my column project.  For injection molding, I created a rhino file to make a precise form since I am injecting each side and they must fit together perfectly.  I designed this form such that a mold can be made of one of the sides and two injections can be pulled from the same mold and will fit together to form the whole.  There are pegs and holes in the piece that fit together snugly (in theory) and leave a cavity in the center to be filled.
     There were about a dozen trial versions of this design and I hope that this version will be successful.  There were many calculations that had to be made to account for the injection molding process as well as the compatibility of the sides (being pulled from the same mold).  It's on its way from Shapeways and I'm excited to see how it turns out!  I got it printed in transparent detail, as apposed to white strong and flexible, because I did some research and the company suggested not using WSF for mold making.  I think this is because the surface is very porous. 
I am now using what I learned from my previous design to develop a more intricately designed version of the project for the rhino assignment.  It's a work in progress but I am loving how it's going.
Inspiration: